Authors Note – For the last few years, I have been building and selling on eBay the Tandy 1000 EX/HX 3-in-1 adapter and the 3-in-1 v2 adapter.
The 3-in-1 adapter was not my idea, it is the brainchild of Rob K:
https://github.com/rkrenicki/Tandy-EX-HX-3in1/
I originally built my own 3-in-1 for my Tandy 1000 HX. It’s a pretty slick piece of equipment. It adds an XTIDE interface, 1MB of RAM, and a serial port to the Tandy 1000 EX or HX. The version 2 adapter adds two serial ports and a parallel port.
https://github.com/leadacid44/Tandy-1000-EX-HX-3-in-1
https://github.com/leadacid44/Tandy-EX-HX-3in1-V2
I ended up building a few of them when I built my first, and had great luck selling them on eBay. I ended up building a few more. Now I’ve sold over 50 such boards. My major contribution to the project is the documentation. I’ve written a users’s guide, as well as this CF guide, which I include in my sale on eBay – my small way to try selling a ‘complete’ product.
Part of my eBay sale is a small 64MB compact flash card loaded with FreeDOS that provides the new owner with a fully-bootable system, and a known good CF card. Both of which were hurdles when I built my very first adapter for personal use.
Unfortunately I can’t include MS-DOS v5.00 on the card due to license restrictions, even though that would be my preferred solution.
One of the things that has come up, is how to ‘reimage’ the compact flash card if it becomes corrupted – which can happen if the card is taken from the Tandy and written to on a more modern PC. MBRs can be overwritten on accident, filesystem corruption, file deletions, etc.
Below I have included instructions on the ‘reimage’ process. There isn’t a ‘reimage’ process as such, more a DOS re-installation. As you will see, there are many paths and choices in the process.
So, without further ado, here is the “Re-Imaging the Compact Flash (CF) Card” procedure.
Overview
This document will cover the re-image / rebuild process for the Compact Flash (CF) card as used in the Tandy 1000 EX/HX 3-in-1 Adapter. These instructions could be used for any similar system but are specifically tailored for the features that the 3-in-1 adapter gives to the Tandy 1000 EX/HX.
There is no true “disk image” restore process in the modern sense, like with SD cards or USB drives. Instead, rebuilding the CF card is effectively the same as installing DOS onto a new hard drive. As the 3-in-1 adapter implements an XTIDE interface for the Tandy 1000 EX/HX, the CF card should be thought of as a solid-state hard disk. The “re-imaging” process simply uses contemporary DOS tools and behaves exactly like a real hard drive install.
Choosing a DOS Version
Legal Notice
I am not a lawyer. This is not legal advice. Only use MS-DOS if you own a legitimate copy. Do not distribute copyrighted software. I include instructions here for MS-DOS because it is my personal recommendation. I also include FreeDOS instructions as it can be freely used without purchase.
MS-DOS v5.00
For the Tandy 1000 EX/HX, I strongly recommend MS-DOS v5.00. So much so, that I don’t really recommend anything else. Version 5.00 is a good blend between modernity and light resources. Version 3 and version 6 will both work, but with some caveats. Generally, there’s no reason to get branded (e.g. Tandy) versions of the OS.
- MS-DOS v3 is probably older than necessary and has no meaningful advantages over v5.00. Unless you have some special need for v3, probably best to avoid.
- MS-DOS v5.00a is functionally identical to v5.00.
- MS-DOS v6 is noticeably slower, consumes more memory, and has no meaningful advantages over v5.00. Again, unless you have some special need, v6 is probably best to avoid.
I won’t recommend a place to get install media, but if you happen to be searching online for v5.00…
- A known good set of the 720k disk images can be commonly found in a 7zip archive file titled “Microsoft MS-DOS 5.00 (3.5-720k).7z”. The archive contains three disk images.
- Same, for the 360k disk images, “Microsoft MS-DOS 5.00 (5.25-360k).7z”. The archive contains five disk images.
FreeDOS v1.3
A free (as in beer) alternative to MS-DOS is FreeDOS , specifically version 1.3. It works great on the Tandy 1000 EX/HX, it just doesn’t natively install nicely on 8086-class machines. Tech Tangents has a great video on getting FreeDOS v1.3 installed on an XT system here. A copy of his install images can be found on Archive.org here, or a local copy has been placed in this GitHub, here.
Choosing an Installation Method
There are two main ways to install DOS onto a CF card; either via physical floppy disks, or via the XTIDE serial floppy (serdrive). Both methods work well. Your choice depends primary on available hardware.
- Physical Media
- Use physical media (e.g. floppy disks and disk drives) to install DOS in the traditional way.
- Simple and well understood. No host PC required during install.
- Requires working floppy drives in both host PC and Tandy. Requires good floppy media.
- Working with 360k disks can be problematic. Working 360k disks are often hard to find, and drive head alignment issues can cause inter-system compatibility issues.
- 720k disks are generally more reliable, and writing disks on a modern PC tends to be more successful.\
- XTIDE Serdrive
- Use the XTIDE interface to mount a virtual floppy drive over a serial cable from a host PC running Windows.
- Somewhat more complex. Requires additional hardware. Requires host PC. Great explanation here.
- Does not require working floppy drives or media.
- Supports any standard floppy disk images. So for example, you can use 1.44MB floppy images on a system that only has a 360k drive.
- Recommend version v2.0.0 Beta 3 (Apr 16 2019) as it fixes a bug with 720k disk images.
- Explanation and download here.
- Alternate download from GitHub here.
- Requires a host PC to run the software. Windows XP or higher is required.
- Requires the host PC have a serial port. A USB to serial port adapter can work well.
- Requires a null-modem, DB9 M-M cable to connect both.
- Keystroke timing can be tricky, but once you get the hang of it, is relatively straightforward.
- Allows use of any compatible floppy disk image, even if the Tandy didn’t originally support it – e.g. 1.44MB floppy disks.
- Can transfer data faster than original FDD interface.
- Difficult to troubleshoot. If it doesn’t work, can be difficult to determine why.
Tools and Supplies
- Compact Flash Card
- I recommend CF cards between 32 and 512 megabytes, generally from brand names you’ve heard of.
- Cards smaller than 32MB would work, but you would likely run into disk space constraints. Mostly a quality-of-life thing.
- Larger cards would work but are likely larger than necessary.
- The XTIDE interface has no upper limit on drive (CF card) size, but MS-DOS 5 and FAT16 limit individual partitions to 2GB in size.
- A great source of smaller, but not worn out, CF cards are ones from older Cisco routers. These can often be found on eBay for very reasonable prices. Generally these Cisco cards are written to only a handfull of times in their lives.
- Host PC
- Windows XP (x86) works great
- Windows 7 and 10 also work
- If you are creating physical disks, the Host PC requires a working floppy drive.
- Note – USB floppy drives have given inconsistent results and are generally **NOT **recommended!
- CF Card Reader
- Compact Flash to IDE Adapter + IDE to USB Adapter
- I’ve found this method to work the best, as it seems to logically treat the CF card as a normal fixed disk to Windows, the same way as a spinning disk would be.
- Generally, an external power supply is not necessary as it will all be powered by USB.
- https://www.amazon.com/Syba-Compact-Adapter-Enclosure-SD-ADA45006/dp/B0036DDXUM
- https://www.amazon.com/Adapter-FIDECO-Converter-5-25-Inch-DVD-ROM/dp/B077N2KK27
- USB Compact Flash Adapter
- I’ve had mixed luck with this style of adapter. It seems to present the card as a ‘removable device’ to Windows, which makes things like partition management more difficult.
- However, they do work well for general file movement on/off the card.
- https://www.amazon.com/UGREEN-Reader-Adapter-5Gbps-Simultaneously/dp/B01ARAH6O0
- PCMCIA Compact Flash Adapter
- Similar to the USB card adapter, these seem to present the card as a ‘removable device’ to Windows.
- These adapters work well for general file movement on/off the card.
- https://www.amazon.com/PCMCIA-Compact-Flash-Reader-Adapter/dp/B07G9Q838K
- Compact Flash to IDE Adapter + IDE to USB Adapter
- Floppy Disks
- If you are using the floppy disk method, you will need 360k or 720k disks as appropriate for your Tandy.
- You can (generally) convert a 1.44MB floppy to a 720k floppy by putting a piece of opaque tape over the left-hand shutter on the disk. Instructions here.
- Serial
- If you are using the XTIDE Serdrive method, you need a null-modem serial connection between your Tandy and your Host PC.
- USB to serial adapters work well. Get an adapter with the ‘FTDI’ or ‘Prolific’ chipset, rather than the ‘CH340’ chipsets as they seem to behave better under Windows. Usually the CH340 chipset-based adapters are the cheapest ones.
- MinusZeroDegrees has an excellent diagram of a simple setup here.
- Null-Modem Serial Cable
- USB to Serial Adapter
- Software
- WinImage
- If you are creating physical media, use WinImage on the Host PC to create the disks from the disk images.
- XTIDE Serdrive
- WinImage
Installation Media Preparation
Once you have chosen your operating system and method of installation, the installation media needs to be prepared for that method.
- MS-DOS v5.00
- Use the MS-DOS v5.00 720k disk images that are commonly available online. The full install set is three 720k disk images.
- Physical Media
- Use WinImage on your Host PC to create the disks from the disk images in the usual way.
- A good explanation of the topic is covered here .
- XTIDE Serdrive
- No special prep is necessary to use the images with serdrive.
- FreeDOS v1.3
- Use the FreeDOS v1.3 360k disk images available on the Archive.org page, or that are located in this GitHub page.
- Physical Media
- Use WinImage on your Host Pc to create the disks from the disk images.
- If you need, the FreeDOS 360k disk images can be written to 720k disks.
- Open the disk image in WinImage.
- Image –> Change format… –> 720KB –> OK.
- Disk –> Format and write disk
- XTIDE Serdrive
- No special prep is necessary to use the images with serdrive.
Compact Flash Card Preparation
The general idea for CF card prep is that we want to wipe the card of any and all previous content, including filesystems and partitions. DOS installers natively and gracefully handle installation onto ‘wiped’ drives and generally yield the best results. (e.g. booting). This wipe process can be accomplished in many ways.
WARNING! WARNING! WARNING!
This process has the potential to destroy the contents of any disk on your system. Be absolutely sure you are working with the CF card before wiping its contents!
This process will destroy all contents of your CF card! Ensure this is what you want to do!
WARNING! WARNING! WARNING!
Special Notes:
- The Windows command line tool ‘diskpart’ is the preferred method, as it performs a much more thorough cleaning of the card.
- However, ‘diskpart’ can have trouble identifying cards on some adapters, presumably whether or not the disk is considered removable.
- For example, on my Windows XP laptop, my PCMCIA to CF adapter does not work with diskpart, but my USB to IDE to CF adapter chain does.
- The Windows GUI tool ‘Disk Management’ can be an acceptable alternative.
- However, it is not possible to completely wipe the disk of all partitions and formats.
- Other tools that manage disk partitions (fdisk, Gparted, Partition Magic, etc.) may also be acceptable.
- Special note! If you experience a lot of delays or long scan times when accessing the CF card within your partition tool of choice, it is possible that the CF card is damaged or corrupted. If possible, try a different card or doing a ‘zero wipe’ of the card. If you have access to a Linux system, it may be useful to do a ‘dd zero wipe‘ of the card.
- This will write zeros to all of the sectors of the card, ensuring all can be written to, which can be helpful if you question the integrity of a card.
- This does, however, write to the entire card, which will shorten its life expectancy. Only do this if you really need to.
- Consider this an item of last resort to completely wipe a card.
- Instructions can be found here.
These steps need to be performed on your Host PC and assume a Windows XP system.
Diskpart CLI
- Insert or connect the CF card to your Host PC.
- Click Start –> Run –> Enter diskpart and press Enter
- Diskpart starts.
- DISKPART> list disk
- Identify the CF card. Generally the size of the disk is the key identifyer. E.g. a 32MB card would show a size of 24 MB. Note the disk number and use in the next step.
- DISKPART> select disk 1
- DISKPART> clean
- DISKPART> exit
- DISKPART> list disk
- Safely eject the CF card from the system – OR – power off the Windows PC.
- Your CF card has now been prepared for DOS installation.
Disk Management GUI
- Insert or connect the CF card to your Host PC.
- Click Start –> Run –> Enter diskmgmt.msc and press Enter.
- Disk Management starts.
- Locate the CF card.
- Right-click on the partition on the card and select ‘Delete Partition…’
- Click ‘Yes’ to continue
- Safely eject the CF card from the system – OR – power off the Windows PC.
- Your CF card has now been prepared for DOS installation.
CF Card Validation
- Insert the CF card into the Tandy and power on.
- The XT-IDE interface will display and show the drive auto-detection.
- You should see something like ‘Master 300h BRAND_NAME’ where BRAND_NAME is the name of the card.
- Note – If the card is not detected by XT-IDE here, or the card name is gibberish, try powering off the Tandy, reseating the card, and trying again. If that does not resolve the issue, it is likely that the card is damaged or does not work with the XT-IDE. Try a different card.
CF Card Rebuild
Physical Media
Use this method if you have a working internal disk drive in your Tandy and have a good set of installation media.
MS-DOS v5.00
- Power on the Tandy.
- Insert MS-DOS v5.00 Install Disk 1 into the first disk drive.
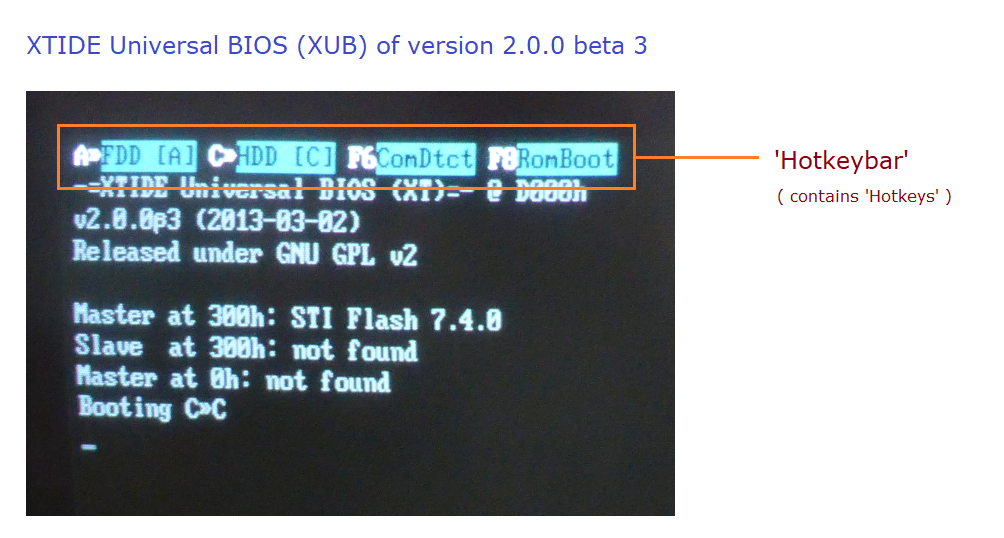
- When the XT-IDE interface displays the hotkeybar, press the A key to select the floppy disk drive as the boot device. The ‘FDD [A]’ option will highlight.
- Note, if you are not fast enough, the XTIDE interface will try booting from the first IDE drive (drive C) the Compact Flash Card.
- Because the CF card has been wiped, it will fail to boot and say something like Boot sector not found
- It will then automatically try booting from the next boot device, floppy drive ‘A’, or if you have a Tandy HX, the internal DOS ROM.
- If this happens, power cycle the Tandy and try booting from the floppy drive again.
- The MS-DOS v5.00 installer starts.
- Press Enter to continue.
- Note, the Tandy keyboard arrow keys do not work correctly in the MS-DOS installer.
- Instead, use the numpad keys to move. E.g. 8=Up, 2=Down, 4=Left, 6=Right
- When prompted, adjust the settings as appropriate for your use case.
- I recommend setting the date and time correctly at this time.
- When complete, highlight The settings are correct. and press Enter to continue.
- Adjust the next set of options as appropriate for your use case.
- I recommend the default to install to C:\DOS
- I recommend NOT running Shell on startup.
- When complete, highlight The settings are correct. and press Enter to continue.
- Adjust the hard disk options as appropriate for your use case.
- I recommend Allocate all free hard disk space for MS-DOS.
- Highlight the correct choice, and press Enter to continue.
- The MS-DOS installer will automatically partition the CF card in the background and then reboot.
- Again, when the XT-IDE interface displays the hotkeybar, press the A key to select the floppy disk drive as the boot device. The ‘FDD [A]’ option will highlight.
- Note, the CF card (drive C) now has a partition table but cannot boot.
- If allowed to try booting, it will say something like Missing operating system and halt.
- If this happens, power cycle the Tandy and try booting from the floppy drive again.
- The MS-DOS v5.00 installer will start again.
- The installer will automatically format the CF card and begin installing MS-DOS.
- When prompted, insert Disk 2.
- When prompted, insert Disk 3.
- When prompted, remove the disk from the floppy drive and press Enter to exit the installer and reboot.
- The Tandy will reset and boot from the CF card.
FreeDOS v1.3
- Power on the Tandy.
- Insert FreeDOS 1.3 Install Disk 1 into the first disk drive.
- When the XT-IDE interface displays the hotkeybar, press the A key to select the floppy disk drive as the boot device. The ‘FDD [A]’ option will highlight.
- Note, if you are not fast enough, the XTIDE interface will try booting from the first IDE drive (drive C) the Compact Flash Card.
- Because the CF card has been wiped, it will fail to boot and say something like Boot sector not found
- It will then automatically try booting from the next boot device, floppy drive ‘A’, or if you have a Tandy HX, the internal DOS ROM.
- If this happens, power cycle the Tandy and try booting from the floppy drive again.
- FreeDOS starts.
- Note, if FreeDOS appears to start (the dots ‘…’ start appearing) but it errors out or halts, try power-cycling the machine and trying again.
- At the command prompt, enter fdisk and press enter. Fdisk starts.
- Do you want to use large disk support? Y/N –> No.
- Choose one of the following –> 1. Create DOS partition
- Choose one of the following –> 1. Create Primary DOS Partition
- Do you wish to use the maximum… –> Yes.
- Primary DOS Partiton created.
- Press **Esc **key.
- Press **Esc **key. (Again)
- Press Esc key. (Yet again)
- Press CTRL-ALT-DEL to reboot
- Again, when the XT-IDE interface displays the hotkeybar, press the A key to select the floppy disk drive as the boot device. The ‘FDD [A]’ option will highlight.
- Note, the CF card (drive C) now has a partition table but cannot boot.
- If allowed to try booting, it will say something like Missing operating system and halt.
- If this happens, power cycle the Tandy and try booting from the floppy drive again.
- FreeDOS starts.
- At the command prompt, enter format c: and press enter.
- Proceed with format? –> Yes. Enter.
- Enter volume label –> (blank) Enter.
- Note, the format should complete very quickly. A 32MB CF card took ~3 seconds.
- At the command prompt, enter sys c: and press enter.
- This will copy necessary files to the C: drive to make it bootable.
- This will take a few seconds and will give an error about failing to open ‘A:COMMAND.COM’. This is normal.
- At the command prompt, enter setup.bat and press enter.
- When prompted, insert disk 2 and press enter to continue.
- When complete, eject the floppy disk and either press CTRL-ALT-DEL or power cycle the machine.
- The Tandy will boot FreeDOS 1.3 from the CF card.
XTIDE Serdrive
This method works extremely well, if you have the tools available.
Host PC Prep
I used a Windows XP laptop with a USB to Serial adapter. Theoretically a physical serial port would work just as well. Serdrive supports Windows XP and higher, I’ve only tested with Windows XP.
Critical Note! I’ve found that, at least on my Windows XP laptop, I have to open the serial port with TeraTerm or HyperTerminal first. Open either program, connect to the COM port with any settings, and then close the program. This seemingly “sets up” the port? Any serial port settings seem to work, and the ‘setup’ that it does lasts until Windows is rebooted. If you don’t do this step, the Tandy will not detect the serdrive presented disk image. I have no idea why this is necessary. It may not be necessary for your setup.
- Place a copy of the ‘serdrive’ software onto the Host PC, for example into a folder called ‘C:\Tandy1000’.
- Place a copy of the desired DOS install disks onto the PC into the same folder.
- Connect the PC to the Tandy using the serial null-modem cable.
- Identify the COM port on the PC that your cable is connected to. My USB adapter was COM4.
- Open Command Prompt (as Administrator, if applicable)
- Browse to the folder containing serdrive.exe.
- cd c:\Tandy1000
- Run the serdrive command:
- serdrive.exe -v2 -b 115.2 -c 4 DISK_IMAGE.IMG
- Flags explained:
- -v2 = Verbose level 2
- Note the lack of space between ‘v’ and ‘2’. This seems to matter!
- -b 115.2 = 115200 baud
- -c 4 = COM port 4
- DISK_IMAGE.IMG = DOS installation floppy image file name, e.g. MS-DOS V5.00 DISK 1 of 3
- -v2 = Verbose level 2
Tandy 1000 Preparation
- Prepare the Host PC with serdrive and disk 1 your chosen DOS installation.
- Power on the Tandy
- When the XT-IDE interface displays the hotkeybar, quickly:
- Press the F6 key ‘ComDtct’ or COM Detect. The ComDtct option will highlight. The screen will display Master at COM Detect: below where it typically shows the detected compact flash drives.
- Press the A key to select the floppy disk drive as the boot device. The FDD [A] option will highlight and ComDtct will no longer be highlighted.
- Press the B key to toggle between booting from the internal physical floppy disk drive A and floppy disk drive ‘B’, the serial drive. FDD[B] will be displayed.
- The screen will display Master at COM Detect: FILE_NAME (COM1/115.2K) if it correctly communicated with the Host PC and detected the floppy disk image.
- Note, FILE_NAME will be the literal file name of the floppy image on the Host PC. For example, DISK01.IMG.
- The Tandy will begin booting from the virtual serial floppy disk drive.
- On the Host PC, you will see messages scrolling in the command window of heads, cylinders, sectors, LBA, etc. as the image is accessed by the Tandy.
Troubleshooting
See below for some troubleshooting items.
- If the XTIDE ComDtct function does not appear to work correctly:
- Confirm that the serdrive software is running on the Host PC and is configured for the serial port connected to the Tandy.
- Confirm that you are using a null modem serial cable.
- Confirm that you have opened TeraTerm, connected to the COM port, and closed the software.
- If the XTIDE detects the serial floppy image but does not boot:
- Confirm that you have toggled the XTIDE software to choose the virtual serial drive as the bootable device. E.g. A to B.
- Confirm that you indeed have a bootable floppy image.
- Confirm that there are no error messages in the serdrive software
- If you experience errors with data transfer between the Host PC and the Tandy, try reducing the serial baud rate from 115,200 to 9,600 (e.g 115.2 to 9600). It will be significantly slower but should work universally. The Tandy 1000 EX/HX 3-in-1 Adapters should be stable up to 115,200 baud.
MS-DOS v5.00
- The MS-DOS v5.00 installer starts.
- Follow the setup and install instructions as written for physical disk installation.
- When the MS-DOS installer reboots, you will need to again boot from floppy:
- Quickly press the F6 button to toggle ‘ComDtct’.
- Quickly press the ‘A’ key to select ‘FDD[A]’.
- Quickly press the ‘B’ key to toggle between drive ‘A’ and ‘B’.
- The Tandy will begin booting from the virtual serial floppy disk drive.
- The MS-DOS installer will automatically start again.
- When prompted to change disks, on the Host PC, in the ‘serdrive’ software console window, press CTRL-C to terminate the serdrive program, and then run the program again, changing the command line options to specify the next disk.
- When the install is complete, on the Host PC, press CTRL-C again to terminate the serdrive program. Then on the Tandy, press Enter to exit the installer and reboot.
- The Tandy will restart and boot from the CF card.
FreeDOS v1.3
- FreeDOS v1.3 starts.
- Follow the setup and install instructions as written for physical disk installation.
- When you reboot the system with CTRL-ALT-DEL, you will need to again boot from floppy:
- Quickly press the F6 button to toggle ‘ComDtct’.
- Quickly press the ‘A’ key to select ‘FDD[A]’.
- Quickly press the ‘B’ key to toggle between drive ‘A’ and ‘B’.
- The Tandy will begin booting from the virtual serial floppy disk drive.
- FreeDOS starts (again).
- Again, follow the setup and install instructions the same as for physical disk installation.
- When prompted to change disks, on the Host PC, in the ‘serdrive’ software console window, press CTRL-C to terminate the serdrive program, and then run the program again, changing the command line options to specify the next disk.
- When the install is complete, on the Host PC, press CTRL-C again to terminate the serdrive program. Then on the Tandy, either press CTRL-ALT-DEL, or power cycle the machine.
- The Tandy will boot FreeDOS 1.3 from the CF card.
Quality of Life Improvements
I’ve collected a few quality-of-life improvements in a zip file located here.
Extract the contents of the ZIP file to the root folder of your MS-DOS v5.00 CF card.
Note – in theory these improvements could also work on FreeDOS, but this is currently untested – certainly the autoexec.bat and config.sys files wouldn’t work directly.
Contents
- DOSKEY\
- Enhanced DOSKEY v2.8. When run, improves the command history (F3) and command autocomplete (TAB) options. Similar filesystem experience as a modern DOS or Linux system.
- DOSMAX\
- Memory manager that lets you take advantage of the EMS memory on the 3-in-1 adapter, leaving more conventional memory available.
- SETBP35\
- Useful for Tandy 1000 HX only – Change default device size of A: from 360k to 720k.
- AUTOEXEC.BAT
- Auto-starts QoL improvements
- CONFIG.SYS
- Configures DOSMAX memory improvements
- SETUPHX.COM
- Useful for Tandy 1000 HX only – Setup program for the Tandy 1000 HX. Allows change of default boot order and other settings stored in system NVRAM.